
EDIT (July 26th 2014) – If you’re thinking of building the WBR, I strongly suggest you check out my most recent build here, which incorporates a mod suggested by LA3PNA, and a different configuration for the AF amp that I think provides nicer sounding audio. The full schematic is published there also.
A few weeks ago when a sizable order of parts arrived from Dan’s Small Parts And Kits, the plan was to use them (along with the parts from a few smaller orders from kitsandparts.com and Mouser) as the basis for some fun home-brew projects. I got my feet wet by building some small circuits Manhattan style – an audio filter and RF preamp for my VRX-1 DC receiver, and a crystal oscillator in an Altoids tin to check out the MeSQUARES I had just received from QRPMe. These are detailed in recent posts.
Like anyone who builds circuits, I have a mental list of things that I’d like to build which is updated constantly. Some ideas get pushed to the back of the queue to make way for newer ones, and some stay pretty close to the front for long enough that eventually opportunity and desire collide and magically, it gets made. This is what happened with the WBR regen receiver.
As a teenager growing up in England, I had a one-tube shortwave regen that I built from a kit. It was an HAC Model DX which used a mere handful of components and used a big rectangular 90V battery for the high tension supply. It used plug-in Denco coils for band-changing (I think I remember having 3 of them). I spent countless hours in my bedroom with the high-impedance headphones clamped around my ears, constantly tweaking the regeneration and tuning capacitors and listening mainly to shortwave broadcast stations. I could figure out which band I was on, but had little idea of the actual frequency. It really didn’t matter though, because the likes of Radio Australia, Radio Tirana Albania, Radio Moscow, Radio Nederland’s “Happy Station” shows, Radio Prague and many, many more kept me glued to that little set. It was just a small bent aluminum chassis with 3 variable capacitors, a battery triode, a set of headphones, a coil, 3 fixed resistors and 2 fixed capacitors, but it was pure magic to me.
I think I spent the majority of my teenage years in my bedroom, listening to my record collection and radios. As an adult who recently semi-retired, it feels as if I’ve come full circle. The chance to spend all the time I want building and listening to radios is an absolute gift, and the WBR Regenerative Receiver (Aug 2001 QST) that I’ve had the pleasure to use these last few days has brought the magic of radio listening back in a big way. It is sensitive, very stable, suffers from no microphonic effects at all, and thanks to the ingenious Wheatstone Bridge tank circuit has very minimal radiation of the local oscillator signal from the antenna port and so no common-mode hum problems. Oh – and no hand capacitance effects either. I haven’t yet measured the drift, but after I’ve switched it on and let it warm up a little, I can set it to a frequency to listen to a net or QSO, and it stays there. Obviously, there must be some drift, which I hope to measure soon, but I’m not hearing any. One more thing, not only is there little long-term drift, but my unit is very frequency-stable when subjected to physical shock too. It’s a great little receiver and has pleasantly surprised me with it’s performance.
I won’t be publishing the schematic for the WBR receiver here, as it’s not mine to publish. (NOTE – Dan has since said he doesn’t have a problem with me publishing the schematic, so I went ahead and published the schematic for the slightly different version I made for the 31M band here.) It appeared in the Aug 2001 edition of QST, so if you’re an ARRL member, you should be able to download it from their site. The article was also reprinted in the ARRL book “More QRP Power”. There were a few errors in the original QST article and although the parts list has been corrected in the “More QRP Power” reprint, the schematic hasn’t. For the record, when you look at the schematic, R17 should be labelled R7, C22 should be 0.01uF, C19 (the capacitor connected between R15 and pin 5 of U2) should be 0.01uF, and “the other C19” – the capacitor connected between R16 and ground, should actually be labelled C20. If they’re going to reprint articles (which I’m very glad they do) I wish they’d make sure that all the corrections are included.
This was the first time I had ever attempted to fabricate an enclosure from PCB material and I’m quite pleased with the results. I won’t fully detail my construction methods, as I got them from K7QO and WA4MNT, and they both already have excellent tutorials available online on how to make PCB cases. Ken WA4MNT’s PDF tutorial is here, and Chuck K7QO’s is here (Chuck’s tutorial has since disappeared from this url and I haven’t been able to find it’s new home, if it has one).
One or two people have asked me how I cut PCB material. If you don’t have a bench shear you can get nice clean cuts by scoring it with a utility blade and breaking it. After using a sharp pencil to accurately mark the line where I want to cut, I use a metal rule and fresh sharp utility blade to make deep scores on both sides of the board. Expect to go through a few blades, and don’t be shy about replacing them; cutting with a nice new blade is a pleasure, while an old one will just give you grief and raggedy cuts. Make sure that the cuts on each side are exactly opposite each other. Then sandwich the board in a vice between 2 bits of wood at the score mark thus:

Then, bearing down hard on the whole sandwich, firmly flex the board up and down until it breaks cleanly off. You can run the board back and forth a few times over a piece of sandpaper, sandcloth etc. on a flat surface to smooth it a little, and you’re done. Easy! If you have a vice, you can use it for the above step.
Work progressed on cutting the panels for the enclosure (the 2 triangular pieces were used later to strengthen the cover) –

and before long I had a drilled front panel, a back panel, a base and 2 strengthening side-struts, which cleaned up with a scotch-brite pad and a little dish soap (for de-greasing). I made sure to rub the Scotch-Brite pad on the board mainly in straight lines as it does give the copper-clad a slight brushed look:

As suggested by WA4MNT in his tutorial, I used an angle iron to ensure 90 degree corners. The one I’m using is actually aluminum angle stock. One thing that I would have had to learn the hard way were it not for this tutorial is the fact that when you solder the pieces of board together, as the solder cools, it shrinks, and you end up with something closer to 88 or 89 degree corners. That can really mess up your nice square box, but Ken tells you how to square up your angles. Little by little the enclosure took shape and the thought occurred to me “Wow, I can actually do this!”:

I gave the finished enclosure a final cleaning with Tarn-X and sprayed it with a light coating of lacquer to prevent against oxidation of the copper. It didn’t fully work, as you can see from pictures of the completed receiver at the end of this post. I’m thinking that I didn’t apply a thick enough coat of lacquer.


I thought it would be fun to fit the controls and stick-on feet to the enclosure to get a feel for what the finished receiver was going to look like:

I have a fondness for quality multi-turn wirewound pots, in the same way that I used to like using high quality air-spaced variable capacitors in my projects. Similarly, the way that a regular one-turn pot feels when operating is important to me. The pot that I originally was going to use for the AF gain felt a little “scratchy” in the way it rotated, so I bought one from Radio Shack that feels silky smooth. Even the first BNC connector that I used for the antenna socket (which was left over from an earlier project) was a cheap component, and I noticed that plugging and unplugging the antenna took more force and fiddling than it should have, so I used a new higher quality part (Mouser # 161-9323). If this seems like a little too much attention to detail, let me explain. The connectors and controls are the way that you, the operator, interface with the radio. Higher quality components used here will greatly improve your experience of the radio. What would you rather use – a radio that takes force and fumbling to connect the antenna, has hard to adjust tuning due to the use of a cheaper one-turn pot, and a volume control that turns roughly, or a radio with controls and connectors that operate and rotate smoothly? These kind of things make a big difference. It might seem illogical to spend so much more on connectors and controls than on the rest of the circuit, but given how positively they can impact the user experience, it’s an investment worth making. I was hoping that this receiver would become a permanent part of my station, so spending a little more wasn’t a problem.
You’ll notice in the next picture that I used two 10-turn pots. One was for the tuning, and the other for regeneration. In the QST article, N1BYT details his method of using a one-turn pot with a separate preset to set the regeneration range on the main regen control. I’m sure that this works very well, but I happened to have an extra 10-turn pot available and was wanting an excuse to use as many of these wonderful things as possible, so I omitted the preset (R6 in the article) and used a 10-turn for the regen control. You do get a “whizzing” sound when adjusting the regen if you use a wirewound. To eliminate this, you can bypass between the wiper and ground for both audio and RF with a 10uF and 0.1uF connected in parallel. I’ve left mine as is for the time being, as I quite like the whizzing sound! (Edit: The novelty of the whizzing sound wore off swiftly, so I placed a 33uF cap between wiper and ground at the regen pot. It took care of things nicely.)

Daniel N1BYT’s original design for the WBR didn’t use a volume pot in front of the LM386, relying just on the 1K RF attenuation pot in the antenna lead. I decided that I wanted a little more audio gain in order to drive a loudspeaker, so I used the audio chain from N1BYT’s OCR II receiver, but connected a 10uF electrolytic between pins 1 and 8 of U2 to get the maximum gain of 200 out of the LM386 IC. Running the LM386 with maximum gain, and also fed with a preamp, I wanted to be able to control the gain of the AF stage as well as being able to attenuate the RF input, hence the extra pot. The toggle switch will be used to switch audio filtering at a later stage.
The enclosure build had gone so well that I started hoping that the performance of the receiver, when I built it, would be good enough to justify putting so much time and effort into the case. In retrospect, I probably should have built and tested the circuit first before deciding whether it was worthy of an enclosure. Luckily it was.
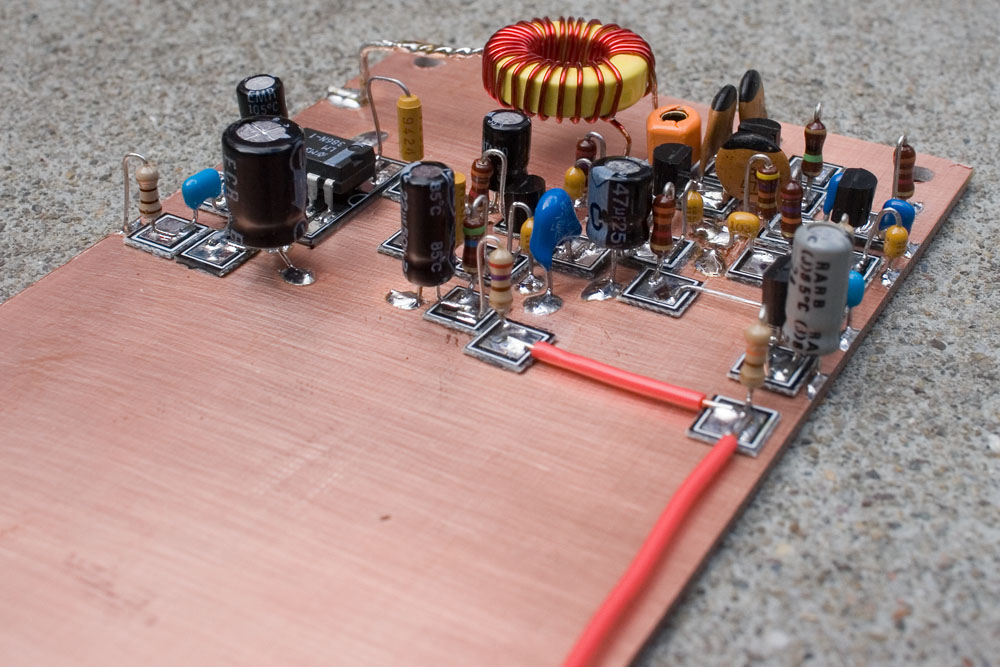
I built the circuit Manhattan style using pads from W1REX at QRPMe. I talked about the MeSQUARES in an earlier post and liked them so much that I ordered a sheet of MePADS from Rex. MePADs are Manhattan pads for IC’s, as you can see in this picture. I had already broken off the pad I was going to use in this project:

As you’re building with these pads, if you find that you’ve glued one in the wrong place (I use Super Glue in the gel form), just slip a sharp utility blade underneath the pad and it comes right off. No need to fear a bad circuit layout, as you can change it if you make a wrong move.
The first part of the circuit to be built was the detector and regeneration circuit. I didn’t have an MV104 dual tuning diode as specified in the original article, so used two back to back MV209’s, which you can see in the following picture, along with Q1 and Q2, the 2N3904 oscillator transistor and the MPF102 detector respectively:

Now I’ve added a few more components, including the 78L05 voltage regulator, which is hiding behind the grey 2.2uF electrolytic in the foreground:

The completed circuit. At this point, I hadn’t added the 10uF electrolytic between pins 1 and 8 of U2 (LM386). The 2N3904 audio preamp is just below the LM386 audio IC:

Some more views of the completed circuit. I knew that I was giving myself plenty of space to work with, but didn’t realize that there would be so much of it left over. This is rather handy though, as it allows room for some low-pass audio filtering that I want to add later:


All very well and good, but would it work, and how well? The next picture shows the board installed in the case. I added a 10K trimpot in place of R12 in order to adjust the tuning coverage of R11, the main tuning potentiometer. You can see the orange trim-pot near the front left-hand side of the board. It was only just now looking at this picture, that I realized I had left out C22, the 0.1uF capacitor in the antenna lead:

The same shot from a slightly higher angle:
 By adjusting trimmer capacitor C8 and the trimmer resistor in place of R12, I achieved coverage of approximately 6970 – 7311 KHz. The extra 11KHz at the top of the band was important to me so that I can listen to the BBC World Service on 7310. Vatican Radio broadcasts in English daily at 0250 utc on 7305, so the extra coverage above the top end of 40 allows me to receive that also. Adjust C8 to set the top end of your coverage, and the trimmer in place of R12 to set the bottom end of the coverage. The tuning rate is a bit higher at the bottom end of the band than the top, being about 50KHz/turn in the CW sub-section.
I spent a few days enjoying the radio in this state before making a top cover for it. The RF attenuation control doesn’t take the input signal completely down to zero. No doubt this has a lot to do with my decision to use an unshielded piece of copper wire to connect the antenna socket at the back of the rig with the 1K pot. N1BYT does this in his receiver pictured in the QST article. I liked it because it’s a reminder of the days when complete radios were wired using this technique, but I think I’ll probably replace that wire with a length of co-ax (after fitting C22 inline with the antenna lead) from the BNC to the 1K pot. That should allow attenuation of the input down to zero (or very close). (Edit: I just did, and it does.)
A top cover for the receiver:

The completed WBR Receiver (darn those front-panel fingerprints!) –
 The space left at the top right-hand side of the front panel was in case I found a way to hook up a frequency counter to the regenerative detector while in oscillation in order to provide a frequency readout. I have heard of people achieving this with the WBR by placing a pick-up coil near the main tank coil. Still not sure whether I’ll pursue this.
Some of the things I’ve heard on this wonderful little radio in the first few days of owning it are the Vatican Radio transmitter in Sackville, New Brunswick on 7305 and Radio Australia (it was great hearing their Waltzing Matilda sign-on melody). I also heard FO8RZ in French Polynesia on 7001 and immediately switched over to the Norcal 2N2/40 to work him with 4 watts! One of the reasons for building this receiver was in order to listen for AM activity on 40 (amateur, as we all know that there is plenty of broadcast activity there!) and I was happy this morning to hear W6LHQ running 200W of AM from his QTH in Modesto, CA on 7293KHz. This is one great thing about a regenerative detector – it will receive SSB and CW as well as AM. I believe it can receive FM too via the slope detection method, though I haven’t had a chance to try this out.
The Wheatstone bridge circuit in the tank is an elegant way to resolve the problem of oscillator radiation from the antenna that is common in simple regens, without resorting to adding a stage of RF preamplification, and it works very well. I made no particular effort to match C5 and C6, so either I was lucky, or the circuit is forgiving, because I have encountered no issues with re-radiation. Without re-iterating the summary of this receiver’s performance that I gave in the second part of the 4th paragraph of this write-up I’ll just say this; I was hoping that this regen’s performance would be good enough for me to have it as a permanent part of my station, and it is.
The next step will be to replace the antenna input wire with a length of co-ax, and then build some audio filtering. At that point, I’ll make some recordings of the audio and post a YouTube video.
I’m also thinking about bread-boarding another version of this receiver to encompass a larger portion of the shortwave spectrum. I have some MV108 varactors, and am thinking that the wider capacitance swing of one of those could give me broad coverage of a large part of the HF spectrum, with a fine tuning control provided by another diode. It would be great to have a regen to give me continuous coverage of, say, 3 – 10MHz, or even higher.
Lots of fun and experimentation to come. Many thanks to N1BYT for this fine little receiver.
Notes added after above post was written –
*Current consumption is low too – I measured around 12-13mA in regular use.
*A number of other builders have experienced problems with low sensitivity with their WBR’s. LA3ZA found that substituting a 0.22uH inductor for Z1, the 1″ length of stiff wire between the center-tap of the coil and the ground plane, did the trick. In the QRP-tech group on Yahoo, Steve AA7U did some experimenting and found 1uH was the optimum value for him. Other builders have not had these issues with theirs. My suggestion would be to build it as in the original design, adding the inductor if it seems necessary.
*As mentioned earlier, I added an audio pre-amp stage to my WBR, as suggested by N1BYT in the original article. The schematic of the simple stage I added can be seen in this post.
*If I were building this again, I would change the configuration of the LM386 amp stage. Using a 10uF cap between pins 1 and 8 to get maximum gain introduces quite a lot of hiss. The design that VK3YE used in the Micro 40 utilized a couple of ideas that had been discussed in SPRAT and is lower noise. I would try using the 2N3904 pre-amp as detailed in this post with the LM386 circuit as used in the Micro 40.

Dave,
Very nice Project !!
Eldon – WA0UWH
Wow, seriously nice work 🙂
Mike
WE0H
Outstanding Build, Dave. Great photos, also.
Excellent job on this project. It is beautiful in construction and operation. Very nice Dave. 73
Great construction,,,I have never been able to be this precise.. Russ AE4NY
Beautiful receiver mate, I plan on building this one.
I have built the Sputnik receiver but this one seems a bit better.
Cheers Keith
VK4XK
Great construction,,Very precise! Russ.AE4NY
Thanks for the excellent description and pictures. Now I have a new benchmark for ‘ugly’ construction. 73 de KD5CMN
Simply a work of art!!
Herb Case WR9H
Dave, I can never post an image of any of my handiwork now that you’ve raised the bar so high!
Good morning Dave, very nice attention to detail and very nice work for sure!
Mike
Beautiful! Have you thought about using the “excess” space for an internal battery pack?
That’s a good idea Bruce. I don’t think I’m going to be changing or adding to this particular one much though as I’m beginning to plan the next version of it, and that is where my head’s at now.
Where can I find the schematic circuit diagram of this receiver ?
Please reply to the Regenerative list and to
arnaldo dot coro at gmail dot com
I just sent you an e-mail Arnie.
I am impressed by this bit of homebrew! I can’t add much to the praise of other hams so VY FB OM!
Frank, KA8SYV
Hi Frank! How’s the 817 doing?
Most excellent construction!
state of the art om bravo!讚!
Wow, such clean work, very impressive. I also would like a copy of the diagram as I’m thinking this would be an excellent ‘group build’ project not only for our local QRP group but even Build Projects at other venues.
Darwin (Dar) Piatt W9HZC
Assistant Nebraska Section Manager
Director – Nebraska Elmer Squad
I think it would make a very good group build project Darwin. I do know of one other club who are currently making a group build out of it and am sure many have done so in the past. I’d love to post the schematic here, but as it’s been featured in ARRL publications and is a fairly unique circuit it probably wouldn’t be the best idea. N1BYT’s original article is in the Aug 2001 edition of QST – downloadable from ARRL if you’re a member, and there is a reprint of the article in the ARRL book “More QRP Power”. Make sure to get the corrections to the original article also – there were a few errors in the original schematic and parts list. I can help you out with that if you e-mail me – I’m good in QRZ.
For anyone who builds this receiver and puts it in a nice enclosure, it would make a good basis for a home-brew station. I’m sitting at the bench right now building a simple 2 transistor TX to team up with it.
One more thing – if you do go ahead with a group build for the WBR, let Dan N1BYT know. Designers love to hear that their work inspires people to build – in this case, it’s 10 years since the circuit was published, so I’m sure he’ll find it very gratifying.
Hello Dave;
Sorry for the delay in the reply. Grate stuff, I will go out to the ARRL site and look for the article and I also beleive I have at least one copy of that book, if not more. I send you an e-mail later in the evening. I beleive I will first build one on my own and then work and rolling it into our group build. Our guys and gals love things like this and will be impressed with your work. And, yes, I will let Dan know when we get to that stage. i know how those designers are. one of our members is Dale Botkin of Ham Gadgets.com and is happy everytime I tell him how good the Pico keyer is! 🙂 (you have to be careful cause after a while they get a big head )
Thanks very much for the reply and I will do my best to keep you up to date on our progress. If done properly, this could be a great Boy Scout project too!
Stop by our QRP group web site when you have a spare minute. It is http://www.hbqrp.org.
Thanks again Dave.
Dar…
Darwin (Dar) Piatt W9HZC
Assistant Nebraska Section Manager
Director – Nebraska Elmer Squad
Morning Dave.
I down loaded the QST article and have it handy now.
you should get e-mail from me here shortly.
two transistor transmitter? do you ever sleep?
I cant keep up 🙂
Darwin (Dar) Piatt W9HZC
Assistant Nebraska Section Manager
Director – Nebraska Elmer Squad
Actually Darwin, my inability to sleep has been causing me some concern recently but contrary to the way it might appear, I really don’t spend a lot of time building things. I do things in spurts, and there is a lot of non-productive lazy time in between my productive periods. Looking forward to the e-mail!
I was sent a link to this page. I’m a digital electronics guy,so this isnt on topic… BUT… oh my gosh, that is a very nicely executed project 🙂
Thank you very much for all the comments. I’m a little taken aback by the attention this has received and am still, to be honest, a bit surprised, but I’m glad you enjoy it!
I’m building and repairing electronic equipment since 1967, but I’ve never seen such a neat, tidy and “artistic” workmanship in a prototype, even in expensive,hand crafted, esoteric audio…
Best regards
Maurizio Laffi
Dave —
great looking radio !!! also site is amazing been looking at it for a few days — I to would like to get the circuit diagram — could you email it to me — kj4vyi at gmail dot com
thanks
Chad
kj4vyi
Chad – the circuit is in the original article in QST Aug 2001 as well as the ARRL book “More QRP Power”. You can also find a pdf of it online if you get a bit creative with Google!
Sorry for the delay in the reply. Grate stuff, I will go out to the ARRL site and look for the article and I also beleive I have at least one copy of that book, if not more. I send you an e-mail later in the evening. I beleive I will first build one on my own and then work and rolling it into our group build. Our guys and gals love things like this and will be impressed with your work.
Do you have the sizes for the boards you cut.that cabinet could be used for a number of ham related projects.Plus I have to build this receiver.just downloaded the acticle.will be my first regen.I really like the dc receiver’s ne602 stuff.so now on to my first regen…
Thanks David
David – I based the size of the case on the sizes of boards I had just bought from abcfab on eBay. This case is approximately 6″ wide by 3″ high by 4.5″ deep. I wanted to leave space for extra circuits, but ended up using the receiver as it was. If I were building this case again, I’d probably only make it 2″ high.
A real work of art. Looks like it has been done in mahogany 😉 by an inspired woodworker
Hey David,
Is there some central node on the net where info on N1BYT’s Regen Receiver for 40M is collected? Perhaps a kitset is available from N1BYT? I would like to build this superb little RX.
Thanks ~ John
John – I believe that FAR circuits sell a PCB for the WBR receiver. You could try contacting N1BYT in case he has any boards still. He’s good in QRZ. As far as I know, there is no kit available.
Let me know what you find, and good luck!
This might help some of you:
– Google using the string “WBR+Regen+Receiver+40M+N1BYT+circuit” without the quotes.
– Look for this link: http://la3za.blogspot.com/2011/06/regenerative-receiver-for-40-m-band.html
– You’ll find a link near the foot of the page. On the page that opens Click Fil > Last ned original
– download the PDF
Using the search string above also reveals a number of other interesting sites.
I am very impress
John B…FYI here’s the reply from Dan Wissell to my enquiry about kitsets:
Hi John,
Thank you for your note and please forgive my delay in responding. I did not offer a kit or parts for the WBR receiver, however I believe that FAR Circuits (http://www.farcircuits.net/) is still offering the PWB. As for parts, Dan’s Small Parts (http://www.danssmallpartsandkits.net/) here in the US should have everything you need to build the WBR. Honestly, I would have never expected the WBR to be so popular more than 10 years since I designed it!
Good luck and let me know if there is any further help I can offer.
73,
Dan N1BYT
Dave,
That “mysterious chanting” you spoke of at the end of your video is Radio Algerienne on 7295 transmitting from France. I have heard it here in San Diego the last couple of nights between 0500-0600 on my Ten Tec 1253 regen. I’ll be building the WBR soon, but with wider coverage. Looking forward to it!
Mike – I’ll be very interested to see how your regen works out with wider coverage. I started building another one for that purpose but ran into problems with the tuning. Further investigation revealed that it was only tuning over a range of a few KHz, so I think I have a problem with the varactor diodes that I’m using, or the way they are wired into the circuit. At that point I put it aside and carried on with other projects. If you succeed with yours it will inspire me to have another crack at my general coverage WBR!
Dave,
I’m no engineer, but I plan on trying a large value air cap like 365pf instead of the varactors for more coverage. I’ll let you know the results.
Mike
After the issues I’ve been having with my varactors in the wider coverage version, that’s what I plan to do also. You’ll have a little less frequency stability but if you’re intending to use it mainly for AM broadcast, it won’t matter as much. Good luck.
Dave (and the others)
I was also thinking to try the 365 and see what it resulted in. I happen to know a ‘kit supplier’ in california who has a ton of Polyvaricons 🙂
Dar W9HZC
I think I know exactly who you’re talking about Dar 🙂
Wow, what a great narrative! I really like your writing style, it is very readable. Also what a beautiful piece of equipment you built. I am instant fan. 73 John NS5Z
A ham friend and I find your site very helpful for building with copper clad pcboards material.
We both wonder if a schematic is available for the regen receiver??
73, many Thanks, Dave, W6MIK
Dave – As I mentioned in the blog post, the WBR Receiver first appeared in the August 2001 issue of QST. If you’re an ARRL member, the article (with schematic) is archived on their site. A reprint of the article with schematic also appeared in the ARRL book “More QRP Power” on page 4-13. If neither of these work for you, there is also a pdf of the article floating around on the internet. I don’t think it’s supposed to be there, so I’ll leave it to you and Google to search that one out 🙂
Dave- thanks so much for your narrative here and for your Youtube video. You inspired me to try my had at building one of these to pair with my ARC-5 (BC-458A) 40m transmitter. I got the board from Far Circuits and am in the process of collecting the rest of the parts. As a run-up to the WBR, I built the NA5N Pipsqueak described by WB3GCK. You can see pictures of my build at http://www.flickr.com/photos/rasteenb/sets/72157629674291382/.
Again, beautiful job – very inspiring! 73, Rob KA8JBY
Awesome job Steve, I look forward to the book!
PS you rig would look much better with some metal or wood knobs rather than these plastic things…
Hi HAM fiend, Im interested in these receiver, please can I get schematic for this. Thanks :-)…
PS: if is it possible, please send them on my email: jiri.kaplan@stream.cz
Hi Dave and all,
Thanks to your PCB enclosure article I\’ve almost finished a PCB box for my Softrock Ensemble RXII receiver. I have a question about grounding the box. It seems a bit wasted *not* to ground it.
Originally I thought I\’d clear-cut all the front panel ins/outs, so nothing touches the copper laminate to create loops. Then someone on the Softrock group suggested just grounding the BNC antenna input shell to the box. I’d welcome your take on this. How do you handle grounding on your PCB enclosures?
Thanks
73 – John – ZL1AZS
John –
Funny you should leave this comment at this this time, as I am very close to finishing another PCB enclosure myself – this one for a small direct conversion receiver I’ve been building. I made it from red single-sided board.
Anyway, I’m afraid I can’t be of too much help with the grounding issue as I haven’t had any grounding problems with any of my PCB enclosures, so haven’t had to think about it that much. I don’t make clear-cuts in the copper around the holes, so all my connectors make contact with the copper. The BNC connectors I use come with a shake-proof washer that I place directly in contact with the copper on the inside of the case so that when the nut is tightened, it bites into the copper and makes contact. Whether or not the other connectors make contact with ground, the BNC does.
Best of luck with that Softrock receiver kit. Tony is providing a great service to the ham community by providing these kits at such reasonable cost. If you ever get around to it, I’d love to see a picture of your finished receiver John.
Dave
AA7EE
Thanks for your quick reply Dave! One last question:
What stage have you found best to apply the protective spray to the inside/outside of your PCB enclosures? I imagine it would be after you’ve soldered your case together, and after a final clean with isopropyl?
Hopefully you’ll have time to show us some pics of your new DC receiver 🙂
73 – John – ZL1AZS
John –
This WBR receiver was the first time I ever built an enclosure from copper-clad laminate, so it was a learning experience, One mistake I made was to only apply one thin layer of lacquer. As a result, in the year since I built it, the copper has developed a strong “patina”. It still looks pretty good, but now I realize that had I applied two or 3 thicker coats, it would probably be looking a lot shinier at this point. For this build, I applied the lacquer after soldering the case together. However, I now apply 2 coats of lacquer immediately after cleaning the boards. I allow it to dry for a few hours, then mark the points where I will make solder joints, and scrape off the enamel at those spots before soldering.
Did you see the case I made in this post? – https://aa7ee.wordpress.com/2011/09/24/the-cc-20-first-beta-version/
I will most certainly post pictures of the new DC receiver – hopefully in about a week.
73,
Dave
AA7EE
Thanks for the low-down on coating the PCB Dave. Yes I did see the CC-20 case. I love that red board. Stunning! It absolves you from coating the outside and you could probably leave the inside coating as well. However, knowing your careful work methods, it’s unlikely that you’ll NOT coat the inside 🙂 Am I right or am I right?
You’re right John – I do lacquer the inside of the cases. I have started lacquering my circuit boards too, due to the boards I built recently that were not lacquered and started looking quite unattractive after a few months, even though they were still working perfectly, of course 🙂
You’re amazing Dave. A million years in the future it may be that one of your projects is discovered, fossil-like, in the sandstone, with the copper shining and perfectly preserved 🙂
Thank you, poweredbynature!
Hi, very nice explanation of box building, I think I will postpone my trip to by a saw 🙂
Few questions:
Have you considered to use aluminum corners to make the construction stronger?
Interesting way of toroid mounting. How stable it is?
Surprisingly enough Petro, the VFO is quite stable – it shifts frequency very little when the receiver is knocked, and the long-term drift is low too. I haven’t measured the drift, because after a warm-up period of 15 minutes or so, it’s not noticeable. I’m sure it’s there, but it’s not a problem for the listener. As you can see from the photos, the gauge of wire is fairly thick, which does a lot to support the toroid. I’m pretty sure it was 22 gauge by the American Wire Gauge standard (0.0253 inches diameter = 0.644mm).
No, I haven’t considered anything else to make the case more rigid, but if I were building this receiver again, I would make it a lot smaller. The current case is 6″ wide by 3″ high by 4.5″ deep, which leaves a lot of empty room inside. These cases are quite rigid – I use small triangular reinforcement pieces in the lid to make them stronger. A smaller case would be stronger still.
very nice project! you said you use the multi-turn wirewound potentiometers, what do you think of conductive plastic potentiometers? it appears they are very smooth, but i never used them. see http://www.resistorguide.com/potentiometer/
I have never used them either Joe and know almost nothing about them. Do you know if they are available in multi-turn versions? If so, they might be quite useful. The only downside I can think of to using wirewound pots for tuning is that there is a very small discrete step as the wiper travels from one wire to the next of the resistive element. In practice, unless you’re covering a wide frequency range with your pot, the discrete steps are not big enough to be an issue.
Dave, I’m really impressed with your beautifully done WBR receiver. I wonder what you would use as tuning diodes these days. I can’t seem to find these devices.
Jack – I used 2 back to back MV209’s in this receiver, which I got from W8DIZ at http://www.kitsandparts.com/index.php As of this writing, he sells them for 5 for $4. He also has MVAM109’s. I bought a few dozen MV1662’s from Earl at http://www.hamelectronicsmagazine.com/ – the page with the MV1662’s on is at http://www.hamelectronicsmagazine.com/MV1662.html He has other varicaps on his site too. He’s honest and good to do business with. There are quite a few sources of varicaps (varactors, tuning diodes, whatever you call ’em!) online. A Google search should turn up some interesting finds.
Awesome article on a great little project, it’s inspired me to go from kit building to homebrewing from scratch. I’m about a third of the way done with the board now.
Question: the schematic from QST shows two capacitors that I don’t see anywhere in the parts list, C15 goes from pin 1 to pin 3 of the voltage regulator and C18 goes from pin 5 to pin 8 of the LM386. I assume these are supposed to be 2.2 pF electrolytic’s?
Chris KK0G
Yes Chris – they are both 2.2uF electrolytics – I didn’t notice that discrepancy. I didn’t use a 2.2uF for C18 because I actually used a slightly different AF stage, with an extra stage of pre-amplification. The schematic used for the AF stages is in my post at https://aa7ee.wordpress.com/2013/03/10/w9rnks-wbr-regen-odyssey/ I put a 10uF between pins 1 and 8 of the LM386 to maximize the gain of that stage. Using the extra stage of pre-amplification, the WBR could even drive a small speaker in a quiet room, and has plenty of volume for earphones.
Please let me know how your WBR works out, and good luck with it!
Thanks for the answer. I’ll let you know when I’m finished.
PS: I just found another cap not shown on the parts list – C14 which is another 2.2uF from pin 2 of the LM386 to the drain of the JFET.
73 de KK0G
I finished the board tonight and when I powered it up, amazingly it worked! Admittedly it does have EXTREMELY weak signal strength but I was still able to copy several CW and phone stations. The signal peaks up considerably from hand capacitance when a finger is placed close to the toroid and the antenna gain has no effect on signal strength so I still have a little work to do on the oscillator but I doubt it will be a huge obstacle. I’ll look at it tomorrow after a good night sleep., and then start on an enclosure.
Thanks Dave for the inspiration to dive into my first major homebrew project, 73.
Chris KK0G
Congratulations Chris! If you want to experiment, then adding an AF pre-amp stage might well improve the copyability of weak signals, and if you still think you’re having trouble with the sensitivity it might be worth experimenting with a inductor of value somewhere around 1uH between the center-tap of the coil and the ground plane.
But the main thing is that you have it working. I’m really glad!
73 for now,
Dave
AA7EE
Hi Dave, very good job, indeed. I wonder where you got those knobs… even being plastic, they are attractive.
Cheers,
Thank you Wagner. Are you in the US? Those knobs are readily available here, and crop up on many QRP projects. In fact, so much so, that I’m starting to think I should look around for some other knobs just to try something different! They are both available from Mouser. The smaller one is Mouser part # 450-2035-GRX for which the Mouser page is http://www.mouser.com/ProductDetail/Eagle-Plastic-Devices/450-2035-GRX/?qs=sGAEpiMZZMuiwDVLTMm01aFL1PAiRZjKfhExNf61WGY%3d and the larger (tuning) knob is Mouser part # 450-2039-GRX and can be seen on the Mouser site at http://www.mouser.com/ProductDetail/450-2039-GRX/?qs=sGAEpiMZZMuiwDVLTMm01aFL1PAiRZjKOu5Ke%252bMlC08%3d
You can also buy the large knob from Radio Shack in the US. It is RS Catalog # 274-402 and can be seen on their site at http://www.radioshack.com/product/index.jsp?productId=2102829 The RS price is for a packet of 2.
I like these knobs too and have used them on several of my other projects. Someone else here commented that he thought the receiver would look better with wooden or metal knobs, but I happen to like these ones. It is all a matter of individual taste, I suppose!
Dave
AA7EE
I can relate to that. I still have the 1LE3 tube from the radio I built as a kid. I just wish I had not thrown out most of it. Learned lots that is still useful to me. This is coming from Philadelphia in the USA.
Elegant, cheap and… it works! Thanks for the lesson.
Fantastic box worksmanship !
David,
Your outstanding construction technique and enthusiastic description inspired me to build this regen receiver. I thought it might make a good companion for the W1TS VINTAGE TRANSMITTER as modified by Ralph Taggart WB8DQT (taggart@msu.edu) that I had earlier this year. I tried to emulate your layout, though I stuck to the original design. After discovering that I had wired the oscillating transistor backwards, the radio came to life! I have two unresolved issues. Despite adjusting C8 (which varies from 3uF to 15 uF), tuning is from 6.94 MH to 7.17, Also, I have the same issue as KK0G in post 45. I will try a ~1Uh inductor.
Thanks for this great project.
One of the great unresolved mysteries about this receiver Steven – and one which I admit I have done no research on – is why some builders have experienced low sensitivity. N1BYT did mention in the original article that it’s best if C5 and C6 are matched, so that the circuit is balanced – not sure how much that might affect sensitivity. Perhaps it has something to do with layout, or the gain of Q1? I didn’t purposely pick a component with high hfe for Q1, but perhaps I just lucked out?
Reducing the value of C7 from 82pF to, say, 68pF, should help you get up to 40M. A lower value here should also slightly increase the bandwidth of your coverage. What kind of diodes are you using for the varactors?
Let me know how the experiment with the 1uH inductor goes.
Dave
AA7EE
The varactor is an MV104 that I found on ebay sold by a company in Hong Kong. The diodes (I ordered a few) arrived quickly and to my relief (surprise) seem to work well. I did not have the foresight to measure C5 and C6 prior to installation. It may be the weekend before I find time to scrounge the parts and make the suggested changes. I will keep you posted.
Steve K K2DKT
Wow – you used the same varactor as in the original design! Nice one – I had to use 2 separate individual diodes (MV209’s). I didn’t measure C5 and C6 either – not sure how critical matching is with those parts.
I look forward to hearing how you fare. 73 for now Steve.
Dave,
I reduced C7 from 82 to 68 pF and the receiver now functions between 6.99MH to 7.37MH. I tried the1iuH inductor, but the reception was noticeably worse than with the original design. So back to the way it was. I watched your Utube video. It seems to me that if I added the amplifier, my rig would sound similar. All that remains is to install the radio in a case. One more hole to drill. Perhaps tonight.
I keep promising that I am going to actually go on the air, but there always seems like onemore project to build.
Thanks for your help.
Steve K
K2DKT
Steve – I think it would be worth building the pre-amp stage. On strong signals I have the volume backed down, otherwise it overdrives the LM386, but I do need all the AF gain I can get for the weaker ones. Not sure if you were aware, but the schematic of the pre-amp that I used is at https://aa7ee.wordpress.com/2013/03/10/w9rnks-wbr-regen-odyssey/
As for going on the air, I spend far more time listening than I do transmitting. In the right company and when I’m in the mood, I can chat away quite a lot but much of the time, I don’t think there are enough words in me to talk the way that many hams do on the air!
I’d rather listen than talk anyway,
Dave
AA7EE
Dave,
Some belated followup. I did the 1uH choke modification and the results were stupendous. Though I cannot drive a speaker very loudly, when I use earbuds I have to back down the “signal strength” control.
I added a power jack to permit utilization of a bench power supply. However, when I leave the battery connected, the battery gets very warm. The power jack is switched (I checked with my ohmmeter). Any thoughts?
The N1BYThas become my favorite receiver. I built a Don Mix W1TS transmitter last year and it, too, provides me with great pride. Something about planning, obtaining, and executing part placement. The actual circuit design, however, is likely to remain beyond my ability.
Steve
K2DKT
That’s great news Steve! I’m in the same boat as you – actual circuit design eludes me. I heard several stories of the 1uH choke working, so it definitely seems like a good solution to this issue of low sensitivity.
The battery getting warm doesn’t sound good. Have you measured the current consumption? Sounds like it’s a lot higher than it should be – mine draws about 13mA on regular band noise. Other than checking all your component values and connections, I don’t have any specific suggestions. My first thoughts are those switch contacts on the power jack. I wonder if something is creating a low resistance path to earth from the +ve battery terminal? Other than a good dose of troubleshooting, I’m not sure what else to suggest.
Congrats on an otherwise working WBR though!
Dave
AA7EE
Dave,
Drawing 11 mA during routine receiving.
The jack has three lugs, two of which are connected when there is no external supply plug inserted. This is the battery mode. When the plug is inserted these two lugs are disconnected and the battery theoretically isolated from the circuit (though the negative terminal remains connected to the ground plane) .The external power supply is connected via the third lug. The battery is obviously being “charged” in some fashion by the external supply. i am just not sure how. This is not a problem for me, since I operate the receiver from an external supply. I doubt I will ever use it the field. As an aside, I found that when using a variable supply, if the voltage drops below 8 volts the unit does not function.
Steve
K2DKT
Aaah, OK. From what you say it sounds as if you suspect there is something going on with that jack and the way the battery is switched in and out of circuit. As long as it’s not a problem for you. You’ll probably figure out what it is eventually. Glad the receiver is working though.
If I were ever to build another WBR, I think I’d try a different configuration of that LM386. I have grown to not like the use of a 10uF cap between pins 1 and 8. It does give a lot of gain, but it also creates a lot of hiss. There are other ways to use the ‘386 that also give good gain, but without the hiss (I have only recently learned about them.) If you look at the circuit of the AF amp in my most recent project, the VK3YE Micro 40 DSB transceiver, it uses an LM386 in a different way, but still achieves good gain without the hiss. I’d use that amp with a 1 stage bipolar preamp (which I did in my version of the WBR). It would be interesting to see how it worked. The link is here – check out the schematic – https://aa7ee.wordpress.com/2013/10/19/the-vk3ye-micro-40-dsb-transceiver/
This is the problem with building your own gear – you always have ideas on how you’d improve things next time round!
73
Dave
AA7EE
I came here from your you tube video. Great looking and sounding regen! Thanks for sharing!
Mel W.
plz Help me
I m constructing radio receiver that can receive 13Mhz to 381Ghz frequency range PLC send circuit diagram at my email id
DK – I found a copy of the original WBR article with a simple Google search. It’s a pdf file. You might also want to look at my updated version of the WBR at https://aa7ee.wordpress.com/2014/06/24/building-a-wbr-regen-receiver-for-the-31m-broadcast-band-2/ There is a schematic in the article.
73,
Dave
AA7EE
Thanks for demonstrating that rf prototyping can result in not just functionality, but beautiful art as well. I’m interested to know what kind of iron (wattage?) and tip you use in Manhattan construction. Your site is a superb resource.
Brian
KK6JTZ
Sausalito, CA
Thank you Brian. I use a Hakko 936 temperature controlled soldering station. I find a temperature controlled iron to be more useful than a non temp controlled iron of any particular wattage. The kind of tip you use can make a big difference too. I use chisel tips only, of either 1/16″ (1.6mm) or 1/32″ (0.8mm) diameter.
73,
Dave
AA7EE
Hi Dave your stuff is a work of art! I too use PCB box construction and have made many rigs like this, have a look at:
http://www.versatronics.co.za/vt/content/construction.html
Wow Graham – your projects are of much greater complexity than mine. Nice work, and thank you for sharing!
Dave
AA7EE
Dear Mr.Richards
I will ask you if it is possible to send me via email schematics or Regen Receiver 40M
Thank you
Martin
CZE
Martin – Google “WBR schematic”. The full original article (as a pdf) should come up as one of the first search results.
Dave
AA7EE
IM SORRY .. may be i have searching wrong … i got it now and have find the correct PDF 🙂 many thanks for quick response Mr Richards
Martin – Google “WBR schematic”. The full original article (as a pdf) should come up as one of the first search results.
Dave
AA7EE
==================================
thank you very much Dave for the hand drawn schematic in the 31M Broardcast Band article!
unfortunately the above mentioned link for the full original article doesn’t seem to be working anymore, is it possible at all to get it updated?
tks a lot!
Joe
Joe – try “Wheatstone Bridge Receiver” or “Wheatstone Bridge Receiver pdf”
Dave
AA7EE
thank you very much Dave, that worked!
beautiful construction and beautiful performance of your builds!
but i have a general question, i’ve tried several good performance regen designs, and failed to get them to perform with my builds. i’m a nooby, what do i have watch for in order to have such nice performance as shown in your various videos, for example, accurate lc tank coverage, successful oscillation, low noise, no power hum, nice tuning, nice regen, etc.?
i used a wall adaptor and a power regulator chip for power, not batteries, and tried a whole lot of decoupling caps, more addittional one where devices are connected to power, plus star gounding, none had much impact on power supply hums. what’s the key here, is using using batteries the only way out? by the way, i used an LM386 for AF.
thank you, and Happy 2016!
Joe
Joe –
My regens operate equally well from batteries or power supplies, Joe. My PSU is a linear type (with a big wopping transformer inside). I don’t know about wall-warts, as I haven’t tried them. Hum in regens is often caused by the signal from the oscillator leaking out into, and being radiated by, the antenna. This radiated signal is picked up by nearby AC supply circuits, and the 50Hz (or 60Hz) modulates the RF signal, which is then picked up by the regen and causes the hum.
I’m curious about the regens that you built. Did they have RF pre-amp stages between the oscillator and the antenna? That is the easiest way to reduce/eliminate hum. The preamp stage doesn’t need to have gain – it just acts to isolate the oscillator from the antenna. The WBR achieves the same result with the use of the balanced tank, and the low level of coupling into the antenna. Using a balanced antenna can help too, instead of a single wire.
PS – I don’t use star-grounding either. It sounds as if your main issue might be possible lack of isolation between the oscillator and the antenna. Putting the regen in a shielded case can help as well.
73, and let me know how it goes,
Dave
AA7EE
PS – my main shack power supply is a small bank of 12V gel cells on constant float charge. That way, when the power goes out, the radios just keep on running!
thank you very much Dave for all the great info and your great help!
those i tried before did have a jfet RF stage in their design, but since i didn’t have any jfets, so i just did without.
this time, i’d like to collect all the right parts, and give the Wheatsone Bridge a try!
very clever and interesting radio technology regen is, i’m not ready to give up on it yet.
your builds are works of envy. maybe they could even be built as wall sculptures, hanging on the wall, working great, performing great, sounding great, and looking great!
🙂
Cheers,
Joe
Love this project!
It is a piece of art.
Seriously
Dave, unless I’m missing something, where is he schematic?
You’re not missing anything Ted. At the time I wrote this post, I didn’t feel comfortable including a schematic for a project that had appeared in QST. However, as I explained in the post, N1BYT gave his approval for me to publish my modified schematic for the next WBR I built, which I did – in that post.
If you’re not an ARRL member, a quick Google search should get you the original article. It’s out there. When you have the schematic, I have shown the schematic for the extra preamp stage I added – I linked it at the bottom of the post.
All the info is there for anyone who really wants to build this, and is willing to do a little digging. However, you have reminded me that in light of my knowledge that Dan N1BYT is happy with me publishing the schematic, I do plan to sit down, draw one, and put it here in this post at some point soon.
Hope that helps,
Dave
AA7EE
Hi there David,
Do you perhaps have an overlay diagram for the WBR receiver? I have etched a surface mount PCB for it, but the structure is too loose and the set will not oscillate. I have also used a point -to -point wire connector in two places for convenience and to give a nod to the old style of doing things, but I think that is also a cause of the set not oscillating. So I think now that Manhattan style is the way to go. I have seen and noted the (excellent) photos of your set but cannot figure out exactly how it all goes together from those.
Can you help me?
James Parry
James – I don’t have an overlay diagram for the WBR, I’m afraid. I built it straight onto the PCB substrate, improvising as I went along. My intention was not to provide an exact set of instructions for building the WBR, but more to provide general information and encouragement. I tend to build in a fairly compact fashion and, if I were to provide overlays, they wouldn’t be able to take into account the different sizes and shapes of various parts that individual builders would have in their parts stashes. If you were able to figure out my layout from the photos, it might not work for you, as your parts will be different, and so will your building style.
I build very slowly, doing my best to think about how each part placement will affect all the others. Because I’m not a particularly agile thinker, I often get it wrong. Luckily, with Manhattan building, you can slide a sharp blade under the pad, pop it off, and re-position it.
Keep your leads as short as possible, and the circuit (especially in the frequency-sensitive areas) rigid, and you should be OK. It goes without saying, but one incorrect connection can render your circuit inoperable, so take great care in following the schematic. Even if it takes a very long time to build, you will have it finished and working for much, much longer, so it’s always a good thing to take your time.
Good luck!
Dave
AA7EE
Thank you David, sound advice. It is such a good design and I am sure that I will get it to work!!
many thanks,
James
Dave–
Just got a new WBR going. Lots of ideas for experiments, though, so it’ll be a work in progress for a while. A couple of ideas and such to pass along. Mine has what I call the “Oscar” front end. It’s a low-noise, variable gain preselector with a novel way of handling that doggone center-tapped inductor with its low impedance. (Oscar is one of our cats, the one who helps me in the lab by gravity-testing tools and components. So far, everything checks out!)
Next, my unit tunes 6 to 15 MHz. Both the preselector and the WBR use Toshiba 1SV149 varicap diodes. They span 25-500 pf and are plentiful and cheap on eBay. That does require a fine tuning pot in series with the main tuning pot, but what the heck? I built the rf decks on 0.1″ spacing through-plated prototype PCB material and use copper foil tape on one side to make ground planes, cutting it away where needed. Sounds awful but actually work quite well.
Turns out the biggest headaches are audio. I tried an old pot I had in the garage (for 30 years!) and it only worked as a noise generator and overall attenuator. That gets changed out this weekend.
If there’s a way of posting a schematic that you can use, let me know. The front end/preselector is something I’ve used in other pieces of equipment and needs to be shared. Nothing too novel or glamorous, just evidence of a huge junk box.
73s,
Sheldon N6JJA
Sheldon – how could I possibly resist a receiver with a front end named after a cat? You’re a homebrewer after my own heart! I didn’t know about those Toshiba varicaps – that’s a good tip.
I would be very interested to see the schematic for your preselector. It just so happens that one of the projects that has been languishing in the back of my head for a while now, may require a preselector. My e-mail address on QRZ is good, if that works for you. I look forward to seeing it!
73,
Dave
AA7EE
Dave–
Let me know what you think of the schematic. Nothing radically new, just put together ideas from a bunch of other folks.
One fellow who is in love with infinite impedance detectors notes that the J201 is superior in that role compared to the venerable J310 or MPF102. From the data sheet I’d agree that it ought to be, so I bought a few on eBay and am putting one into the current WBR. We’ll see how that goes.
73s,
Sheldon N6JJA
Great article. I’ve been looking for a simple receiver to give me the same pleasure I also enjoyed from an HAC DX receiver. I never even knew which band I was on. I only had one coil.
I’m taking advantage of the RSGB’s coronavirus-relaxed exams to gain my foundation licence. I couldn’t get my head round it as a teenager but it remains a life ambition.
I’ll definitely be building this and I like the PCB case. Perhaps the front panel could be photo-etched?
Glad to know you’ll be building this little receiver. I discovered that it is not particularly sensitive to AM, but works well with SSB and CW. If you ever do get round to building it, let me know how it goes. Best of luck with the licence!
Great design! But it is not clear to me how the wires from the variable resistors get to the board? In the photographs, they go somewhere under the payment and disappear there …
Vasily – it is not very clear from my photos, but the cable that is connected to the tuning pot goes under the board, and emerges through a hole I drilled in the board next to the varactor diodes. I like to run the wiring under the board where possible, to make the layout look neater. Incidentally, I used thin and flexible lavalier microphone cable. It has 2 inner conductors surrounded by a shield.